Difference between revisions of "LipidXplorer Tutorial"
(→The LipidX graphical user interface) |
|||
| Line 2: | Line 2: | ||
Install LipidXplorer as described in [[#Install_LipidXplorer]]. | Install LipidXplorer as described in [[#Install_LipidXplorer]]. | ||
| − | The | + | The LipidXplorer installer will create an icon on the desktop with which the programm can be started. |
Example spectra are provided here: | Example spectra are provided here: | ||
| Line 10: | Line 10: | ||
Open the *.zip file and store the content of <tt>spectra_tutorial\spectra_Ecoli_negative\*</tt> to a place of your choice. LipidXplorer cames with a suggested folder structure. You can store the spectra under <tt>LipidXplorer\spectra\negative\</tt> | Open the *.zip file and store the content of <tt>spectra_tutorial\spectra_Ecoli_negative\*</tt> to a place of your choice. LipidXplorer cames with a suggested folder structure. You can store the spectra under <tt>LipidXplorer\spectra\negative\</tt> | ||
| − | ===The | + | ===The LipidXplorer workflow=== |
| − | The workflow of | + | The workflow of LipidXplorer is quite simple: |
| − | # all spectra of all the acquisitions are imported [[# | + | # all spectra of all the acquisitions are imported [[#LipidXplorer Import]] and stored in the MasterScan |
| − | # MFQL queries are loaded into | + | # MFQL queries are loaded into LipidXplorer and run [[#LipidXplorer Run]] on the MasterScan |
| − | # the result can be viewed [[# | + | # the result can be viewed [[#LipidXplorer ouptut]] |
| − | ====The | + | ====The LipidXplorer graphical user interface==== |
| − | + | LipidXplorer comes with a comfortable graphical user interface. It is divided into 4 parts: | |
| − | [[Image:LipidX-Tabs.PNG|right| | + | [[Image:LipidX-Tabs.PNG|right|LipidXplorer modules]] |
# Import Source | # Import Source | ||
# Import Settings | # Import Settings | ||
Revision as of 12:53, 14 January 2011
Contents
Prerequisite
Install LipidXplorer as described in #Install_LipidXplorer. The LipidXplorer installer will create an icon on the desktop with which the programm can be started.
Example spectra are provided here:
Open the *.zip file and store the content of spectra_tutorial\spectra_Ecoli_negative\* to a place of your choice. LipidXplorer cames with a suggested folder structure. You can store the spectra under LipidXplorer\spectra\negative\
The LipidXplorer workflow
The workflow of LipidXplorer is quite simple:
- all spectra of all the acquisitions are imported #LipidXplorer Import and stored in the MasterScan
- MFQL queries are loaded into LipidXplorer and run #LipidXplorer Run on the MasterScan
- the result can be viewed #LipidXplorer ouptut
The LipidXplorer graphical user interface
LipidXplorer comes with a comfortable graphical user interface. It is divided into 4 parts:
- Import Source
- Import Settings
- Run
- MS tools
The Import Source, Import Settings and Run tab are exactly for the first and second steps of the workflow. The MS tools tab is an extra tab with which the user can do some calculations.
Specify input spectra
Or go to the homepage of Python (http://www.python.org), wxPython (http://www.wxpython.org) or NumPy (http://www.numpy.org).
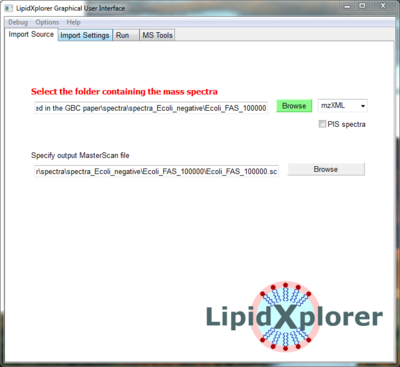
Open LipidXplorer and you will see the 'Import Source' panel. Click on the green 'Browse' button and select the folder
- LipidXplorer\spectra\negative\spectra_EColi_negative\spec_neg_100000 or
- <your chosen folder>\spectra_EColi_negative\spec_neg_100000 respectively
This folder contains 4 acquisitions of E.coli on an LTQ Orbitrap with high resolution MS and low resolution MS/MS spectra in negative mode.
Now the input folder with the spectra is selected. Make sure to have 'mzXML' selected next to the 'Browse' button, because the spectra are in mzXML format.
Specify the import settings
Go to the panel Import Settings.
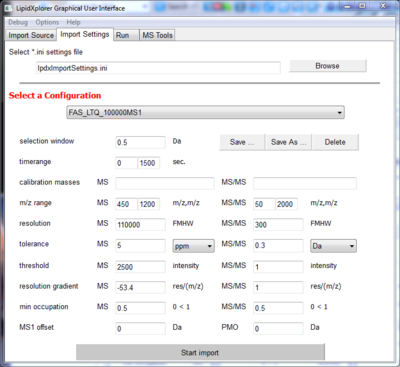
For every import, machine specific settings have to be set. All settings together can be stored in the file given at the top of the panel. 'lpdxImportSettings.ini' is the standard file in which a small collection of configuration are already stored. Select the configuration 'FAS_LTQ_100000MS1' under 'Select a Configuration'. This are the appropriate settings for the selected spectra.
Now hit 'Start Import' on the bottom of the panel and the import will start.
The debug window will report what LipidXplorer is doing.
When the import is ready, a small window will pop-up saying 'Task completed'.
Identify lipids
Go to the panel Run.
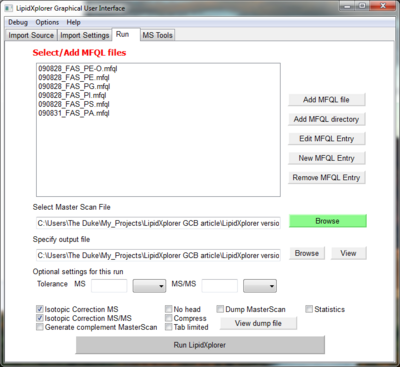
Here we select the MFQL queries we want to use for the identification. Click on 'Add MFQL directory' to select all MFQL files of a folder. Select
- LipidXplorer/mfql/negative_mode.
This is a collection of queries for spectra in negative mode with MS/MS data. Once selected the queries are listed in the query window. You can also drag and drop folder or files there. A double click on on of the queries will open a new panel with the content of the query. Here it can be edited.
Switch on the isotopic correction by clicking on 'Isotopic Correction MS' and 'Isotopic Correction MS/MS'. With a click on 'Run LipidXplorer' the software starts identification of lipids according to the loaded queries.
View the result
By clicking on 'View' (under the green 'Browse' button) the result will pop up as a table. It is automatically stored in the folder with the mass spectra. If you like to store it somewhere else under a different name click on 'Save as ...' in the result window.
The result can be viewed and edited with Excel.


